I: Adjusting the Timing
- Open the movie that was created from the previous page. The balloon seems to be rushing by too fast
- There are two places to slow down or speed up the motion in the animation.
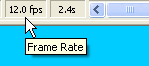
- The frame rate sets the speed for the whole movie. To change the frame rate double-click the frame rate on the Timeline to open the Document Properties dialog box.
- The other method is more specific. You can add frames to slow down the motion or subtract frames to speed it up.
- To Slow motion between two key frames add more frames so that it takes longer for the balloon to get to the second key. frame.
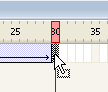
- Place the cursor anywhere between but not on the two key frames and hit F5 to add frames. Repeat until the second key frame is at frame 80. Go to Control > Test Movie to test the speed.
- To subtract frames use Shift F5. Test the move again.
- Another way to adjust the number of frames is to physically move the key frame itself. This method is a little more precarious so you have to be careful. Go to the second key frame. Click once, click a second time and hold down the cursor. The key frame should turn gray. When it turns gray then drag the frame forward along the Timeline to its new location. Then release the cursor.
- If you drag backward you may leave some ghost frames that need to be cleaned up.
- Drag the cursor across the extra frames to highlight them.
- Right click and select Remove Frames from the drop-down menu. The deleted frames turn blue. Click on the frame numbers of the Timeline to remove the blue shading.
II: Move Key Frames and Add Another Key Frame
- The problem with the animation so far is that it has no beginning and no ending. The balloon jumps into the movie at frame 1 and sort of disappears in the last frame.
- To put the balloon on the ground in frame 1, click on frame 1 so that the key frame turns black and the tiny circle in the key frame turns white This means that the key frame is selected.
- Reposition the balloon. Try moving it lower into the left corner of the stage.
- Next add a key frame so that the balloon appears to rise straight upward before moving to the right side of the stage.
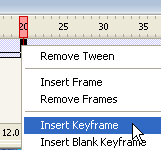
- To add a key frame click on any of the frames between the first and last key frame. ( I selected frame 20). Right click and select Insert Key frame from the drop-down menu.
- While the key frame is still selected (shaded) move the balloon so that it is above the balloon in frame1. This will give the illusion that the balloon is rising upward from frame 1 to frame 20. Then the balloon begins to travel across the stage.
- An view of what the movie may look like so far.
III: Creating a Motion Path
- Another problem with this animation is between the second and the third key frames. As the balloon travels across the stage from left to right it is traveling in a straight line. In nature there are no straight lines. Everything is influenced by something else. The balloon is influenced by the wind, and the amount of heat being blown into the balloon. To make the animation more realistic the balloon should be placed on a motion path.
- To create a motion path:
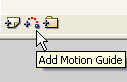
- Click on the Add Motion Guide icon at the bottom of the Timeline.
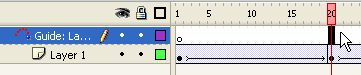
- A new layer appears above layer 1. This layer has a motion guide icon and the color of the layer is white. This is the layer for the motion path that will be created.
- Click the frame above key frame 2. ( In this example movie it is frame 20.) Right click and select Insert Key frame.
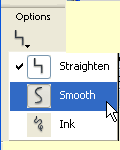
- Once a key frame has been created in the Guide layer, make sure that the Guide layer is still selected(shaded). Select the Pencil tool from the Toolbar.
- Click the Options arrow at the bottom of the Toolbar and select Smooth.
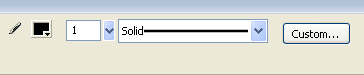
- In the Properties Inspector at the bottom of the screen, select Custom.
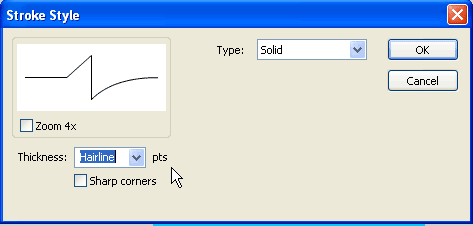
- This opens the Stroke Style dialog box. Select Hairline from the Thickness drop-down menu. Make sure that Solid is selected for the Type option. Click OK.
Note: Flash offers several broken line options but stay away from these unless it is absolutely necessary to have broken or dotted lines in the image. Each line segment must be calculated as a separate object and this greatly increases the file size and rendering time.
- Once the stroke qualities have been selected select Layer 1 and turn on the Lock by clicking the empty space below the Lock icon . This locks the layer so that you do not accidentally draw on this layer.
Note: It is a good habit to get into locking layers that you are not working on. Flash has a glitch. which causes it to switches from one layer to another while you are working on a layer.
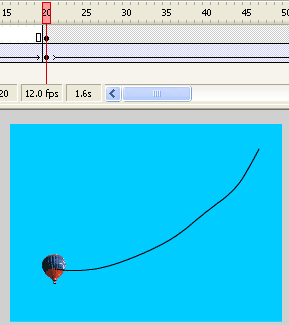
- Draw a curved line beginning near the balloon in frame 20 and ending near the balloon in the last frame.
- Go to View > Snapping > Snap to Guides. Select it to make sure it is checked.
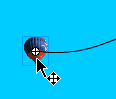
- Unlock Layer 1 by clicking on the Lock icon beside the layer.Go to the second key frame in Layer 1. Using the Selection tool drag the balloon to the beginning of the line. Make sure that the center point of the balloon is on the line
- Go to the last key frame and drag the balloon on to the end of the line. Make sure that the center point of the balloon touches the line.
- Scrub the playhead to make sure that the balloon is attached to the line. Go to Control > Test Movie to text the animation.
- Save your work.
- View of what the example movie looks like with the addition of the motion path.
Copyright © 2006, Christalene Loren. All rights Reserved.