I: Setting up a New Flash Document
- A new Flash document consists of:
- Timeline, which holds the movie's frames, layers and scenes.
- Stage, where the movie is displayed.
- Work area, which is extended on all sides beyond the stage but remains outside the visible frames of the final movie as it plays.
- Flash has a number of panels and often these are just in the way until you need them. To create a custom arrangement of panels for yourself consider the following suggestion.
- Select a panel on the right side of the screen by clicking on the drop-down arrow This opens the panel.
- To remove the panel from the right side of the screen, click on the Panel Options button in the upper right corner. Select Close Panel from the drop-down menu.
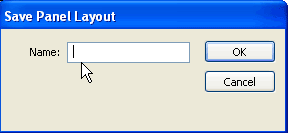
- After you have removed all the panels from the screen go to the Window menu and select Save Panel Layout from the drop-down menu. This opens the dialog box. Name your Panel Layout. Flash saves the arrangement.
- To access your panel layout go to the Window > Panel Sets. In the drop-down menu you will find the name of your panel layout.
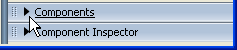
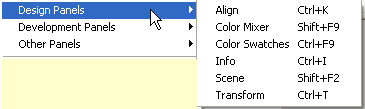
- To open panels as you need them go to Window > Design Panels or Development Panels or Other Panels. Select the panel from the drop-down menu.
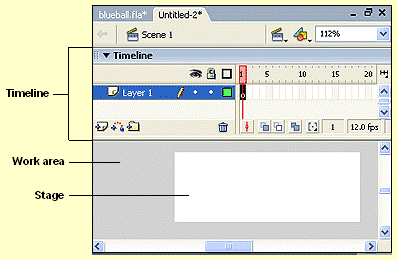
II: The Timeline
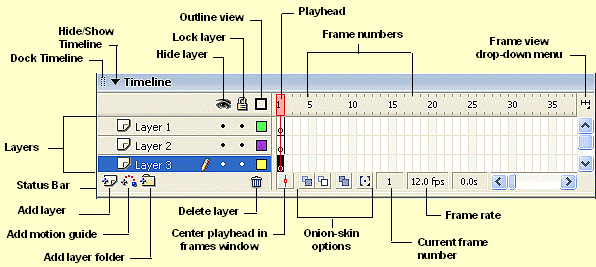
- Diagram of the Timeline.
- The Timeline is a complete record of the movie. It represents each scene, frame, and layer that make up the movie. Frames appear in chronological order. Clicking any frame in the Timeline takes you directly to that frame and displays the contents of that frame on the Stage.
III: The Info Bar
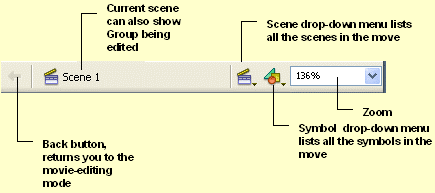
- Diagram of the Info Bar.
- The Info Bar is located at the top of the Timeline. The Info Bar lets lets you know what mode you are working in ( editing the movie, symbol or group).
- The drop-down menus allow you to switch scenes, edit symbols and change the magnification for viewing the stage.
IVI: About the Stage
- The Stage is the area containing the graphic elements that make up the Flash movie.
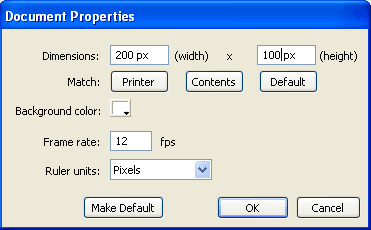
- The size of the stage, the background color and the frame rate are controlled through the Document Properties dialog box.
- The Document Properties dialog box is accessed in one of three ways:
- Go to the Modify menu and select Document from the drop-down menu.
- Use the keyboard shortcut: Ctrl J or Cmnd J(Mac)
- Double click the frame rate display in the Timeline Status Bar.
- The Document Properties dialog box is where you set all the parameters for viewing the Stage.
- The unit of measure is determined by selecting Ruler Units.
- The color for the Stage is selected by opening clicking the Background Color box and selecting a color from the palette. Using a background color helps to optimize the Flash file.
- Clicking the Save Default sets the parameters for all new documents you create.
V: About Frame Rate
- Frame rate determines the number of frames your movie plays per second. This rate corresponds directly to the length of time your animation takes to play.
- In the above Timeline there are 10 frames. The frame rate has been set to 6.0frames.second. The amount of time elasped at frame 10 is 1.5sec.
- To calculate the playback time of an animation using frame rate do the following:
- Take the total number of frames in the Timeline divided by the frame rate = number of seconds to view the movie.
- For example if the Timeline has 10 frames and the frame rate is set to 6FPS(frames per second) the animation will play for 1.67 seconds.
- Some examples of frame rate verses the length of time the animation takes to play.
- When setting the frame rate in Macromedia Flash sets the maximum frame rate for the movie. This is how quickly the movie tries to play. Tha actual playback time depends on any of the following:
- The download speed and the processer speed of the user's computer.
- Frames that contain more objects, gradients and especially transparencies take longer to render on the compute and therefore take longer to playback.
- The recommended frame rate setting should be between 12 fps and 25 fps.
Copyright © 2006, Christalene Loren. All rights Reserved.